ExpressVPN is one of those few VPNs that truly care about your privacy. The provider also prioritizes your online security and anonymity by offering the most robust and stealth features. That’s how it empowers you with freedom of the internet no matter where you are.
One such feature that makes ExpressVPN win over all others is an active kill switch. Of course, this isn’t something unique to ExpressVPN only. You will find it with many other top VPNs, such as NordVPN and Surfshark, as well. However, ExpressVPN has designed this feature in the most resilient and customizable manner.
But how can I really customize this ExpressVPN kill switch, we hear you ask.
Don’t worry. Through this quick guide, you’ll learn how to find, activate, and deactivate ExpressVPN kill switch on your computers, mobile phones, and other devices.
Yet, before that, let’s take a quick look at what exactly this ExpressVPN feature is.
Network Lock – ExpressVPN kill switch
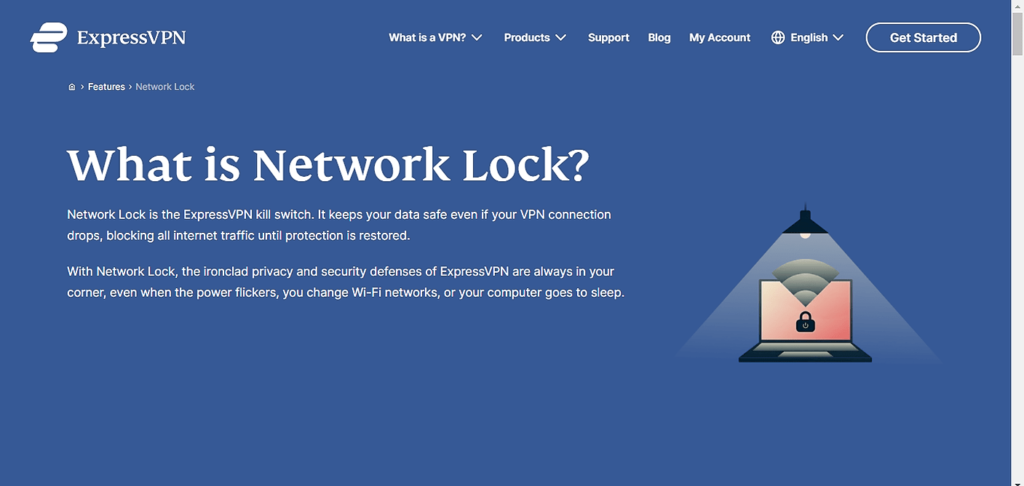
Network Lock is the name of the kill switch feature that ExpressVPN offers to its customers. This feature ensures that your connection stays secure even after the VPN disconnects.
Wondering how’s that possible? Let us explain.
When you install ExpressVPN on your device, it takes control of your internet connectivity. The VPN basically positions itself between your internet connection and your device(s). Thus, all the internet traffic generated from your device first goes to the VPN servers. The VPN then encrypts your data, masks your IP with their own IP (depending upon your chosen server), and then forwards your data to the internet.
In this way, the VPN works independently of your internet and stays connected even when the internet connection goes down.
However, if the VPN client on your device disconnects from the VPN server, the traffic then transmits directly from your device to the internet. In this case, your real IP address and all the data get exposed. This renders using a VPN a complete wastage.
To prevent this exposure and breach of your privacy, ExpressVPN offers “Network Lock” – a kill switch that kills your internet connection whenever your VPN disconnects. In this way, it protects you from all the web tracking activities until your VPN connection reestablishes.
In brief, with Network Lock, your privacy remains conserved when you switch your internet connection, put your device to sleep, experience an internet outage, or face VPN disconnection.
Unless you manually turn this feature off and willingly use the internet without VPN protection, you remain anonymous online.
Nonetheless, whenever you wish to browse without a VPN, simply deactivate the network lock and continue browsing. You can easily do so via the VPN app settings on your Windows, Mac, or Linux systems. You can also customize this feature on Android. However, turning off Network Lock on the router VPN app isn’t possible.
Where to find ExpressVPN network lock on my device?

ExpressVPN presently offers its kill switch across most major platforms.
Precisely, you will find this feature as “Network Lock” on your computers, that is, Windows, Mac, and Linux systems. There, Network Lock protects your device security by aptly managing the internet connectivity in the case of VPN disconnections. Whereas, it also handles the local network connection between your computer and other devices, such as printers.
These settings are enabled by default. That means you don’t have to adjust Network Lock settings after installation. However, if you want to customize the settings, you can do it all via the main settings menu on your VPN client dashboard.
In the case of smartphones and alike, you won’t find this feature as “Network Lock” in the ExpressVPN Android app. Rather it is available as a simple setting that you can adjust manually at any time. Though, the kill switch feature comes activated for Android devices by default (except for Android TV).
As for iOS users, unfortunately, ExpressVPN offers no such thing yet. Let’s see if we can have this feature on iOS apps in the future.
Meanwhile, don’t be disappointed because you do have a workaround for this.
ExpressVPN does offer Network Lock (the same feature available on VPN apps for PCs) on its VPN for router app.
That means you can protect your iPhones and iPads with Network Lock simply by connecting these devices to a VPN-enabled router.
The only downside with the router app, though, is that you cannot manually turn off Network Lock on it. But that won’t be a problem in most cases since you almost always use a VPN to protect your real IP address, for which, you won’t really need to deactivate the kill switch.
How to enable the kill switch feature of ExpressVPN
Now that you know where to find the ExpressVPN kill switch on your device, let’s start with how you can activate it.
Though, as we said, you don’t have to go through these steps in most cases since ExpressVPN clients have it enabled by default. Nonetheless, if you still need to manually enable the kill switch, or want to assure of its active status, here’s how to do it.
On Windows and Mac
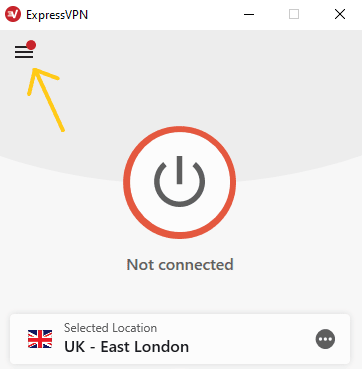
Open the ExpressVPN app on your Windows desktop/laptop or your MacBook. You should see the main screen (something like this) showing the VPN connection status and server details. Click on the settings menu (the three horizontal lines) at the top-left of your screen.
From the list of all settings, click “Options.”
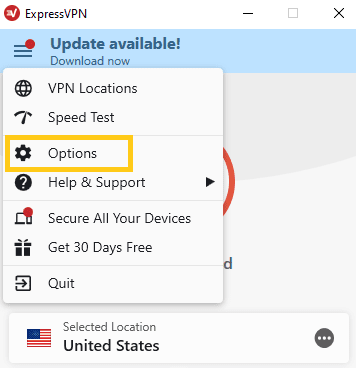
You will now see a new window with different customizable settings for your VPN connection. Here, under the “General” tab, you will find the “Network Lock” menu that has the relevant settings for the kill switch.

Make sure that the box with the option “Stop all internet traffic if the VPN disconnects unexpectedly” is checked. If not, check this setting to activate the kill switch feature.
Whereas, if you wish to keep your local network connections segregated from the VPN, check the “Allow access to devices on the local network (such as printers or file servers) setting.
Once done, move to the “Protocol” tab right next to the “General” tab and click the “OK” button to save these settings.
That is it! You now have the ExpressVPN Network Lock kill switch activated on your computer.
On Android Phone
In the case of Android devices, you may have to meddle with the network settings to enable the kill switch. Though the feature is there, you won’t really find it under the dedicated “Network Lock” name.
To activate, simply open the VPN app on your Android device then follow this path: Menu (three horizontal lines) > Settings > Network Protection. You will see a screen like this.
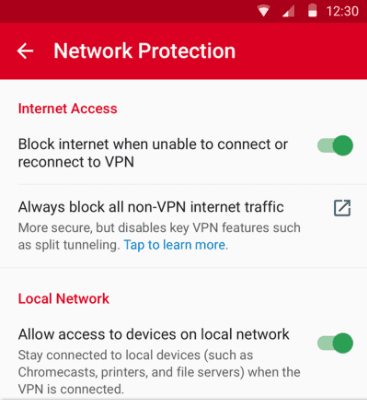
Here, make sure that the setting “Block internet when unable to connect or reconnect to VPN” is toggled on. You now have the kill switch activated on your device.
Whereas, activating the other setting “Allow access to devices on local network” will allow connections from your local network even without the VPN.
You can also ensure better security via the “Always block all non-VPN internet traffic” setting. However, this will disable your existing settings for split tunneling and local device connections.
Besides, ExpressVPN also lets you adjust the kill switch via the Android System Settings for devices running on Android 8 and above. In this case, you have to turn on two options – “Always-on VPN” and “Block connections without VPN”. Again, enabling the latter will disrupt split tunneling and local device connections.
How to disable the kill switch of ExpressVPN
Just as you can enable ExpressVPN Network Lock kill switch manually, you can disable it too.
In fact, in most cases, you will have to learn to disable the kill switch more because the feature comes activated by default for all devices (except Android TV).
The procedure to turn off the kill switch is also quite easy. Here’s how you can do it:
For computers (Windows and Mac)
Go to Menu (three lines) > Options > General > Network Lock. Uncheck the “Stop all internet traffic if the VPN disconnects unexpectedly” option.
For Android
In your VPN app, go to Menu (three horizontal lines) > Settings > Network Protection. Toggle off the “Block internet when unable to connect or reconnect to VPN” setting”. Whereas, to disable the kill switch via system settings, go to the main VPN settings and toggle off the options “Always-on VPN” and “Block connections without VPN.”
Internet service is blocked by ExpressVPN. What to do?
If you face trouble connecting to the internet after running ExpressVPN on your device, make sure that your VPN connection is active. If it isn’t, you can wait for a few seconds for it to reconnect.
Or, if you wish to proceed without a VPN, or you face trouble using the internet even after turning off the VPN, consider disabling the ExpressVPN Network Lock.
However, if nothing works, you may need to adjust your DNS settings. Here’s how you can do it.
At first, change your DNS settings via the Windows system settings.
- Go to Control Panel > Network and Internet > Network and Sharing Center > Change adapter settings.
- For every active connection, right-click on the icon(s) and go to “Properties.”
- Double-click on the “Internet Protocol Version 4 (TCP/IPv4)” option.
- Check the option “Obtain DNS server address automatically” in the new window and click “OK.”
Now open your ExpressVPN app:
- Go to Menu > Options.
- Under the “Advanced” tab, look for the setting “Only use ExpressVPN DNS servers while connected” below the heading “DNS.”
- Uncheck this setting and click “OK” to save.
Similarly, you can adjust the network settings on your Mac and other devices if you face similar troubles.
Conclusion
This was all about adjusting the ExpressVPN Network Lock kill switch on your device. Wasn’t that easy?
Well, this is undoubtedly the best thing about ExpressVPN – ease of use. From installing the app to setting up your connection and tweaking it later, you will find clear options for everything. You neither need to be a tech geek nor do you have to spare hours managing your VPN settings.
Besides, ExpressVPN also facilitates customers with robust security, resilient evasion of VPN blocking and content restrictions, superior anonymity, and widespread device compatibility.
If you haven’t tried this VPN yet, feel free to go through our detailed ExpressVPN review to learn everything about it.
And, if you are enticed to try it yourself, feel free to proceed as ExpressVPN offers a 30-day risk-free money-back guarantee.

